
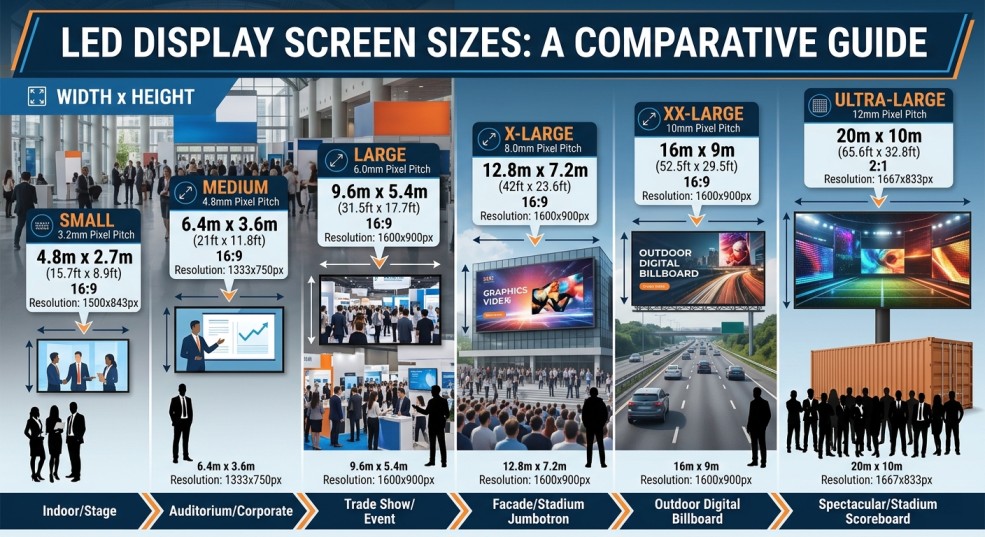
Deciding on the right size for an LED panel may appear simple at first, but it may rapidly become tricky. You might find yourself in the midst of an installation, only to discover that the images are pixelated, the text is hard to read from the back row, or your budget has unexpectedly increased due to hidden structural needs. The truth is that when it comes to LED screen sizing, it’s not as simple as “bigger is better”. It is a precise field that balances physical measurements, human body dynamics, content clarity, and environmental harmony.
Today, LED displays can be seen everywhere: in offices, meeting rooms, store windows, shopping areas, event stages, and festivals, displaying signages using indoor LED screens, outdoor LED screens, transparent LED screens, or big digital billboards. Every installation area, whether it has indoor screens for meeting rooms and stores, or outdoor LED displays for events and billboards, will have different views, light conditions, weather resistance, distances for seeing, and various content needs. Thus, the “right” screen size for a tradeshow booth may not necessarily work for a shopping area.
Different uses need different sizes of LED screens. For example, big screens are important for concerts and stadiums so people sitting far away can see, while smaller screens work well for stores and meeting rooms.
This guide will help you avoid common sizing mistakes. It will teach you how to measure LED screen size correctly, calculate dimensions using pixel pitch and screen resolution, match aspect ratios to your content, follow the rules for viewing distance, and give size recommendations for almost any use case.
Why LED Screen Size Matters More Than You Think
Before starting calculations, it is important to know that screen size influences the viewing experience in four connected ways, not just how it looks. Good quality and clear visuals are essential to keep the audience interested. They make sure the content is easy to read and looks attractive. Getting the right size also ensures the view looks good in the place it is meant for.
1. Visibility and Readability
A bigger screen helps people see things better, but it needs to be the right size for how far away the audience is. In a 30-meter-deep auditorium, people in the back rows need enough screen space to read song lyrics, speaker names, subtitles, and branding. If the screen is too small or too high, even 4K content can be hard to read. A screen that is too big for a small room makes people move their heads a lot, which can be tiring. A smaller screen is better for cozy places like conference rooms or stores, where people watch closely and need clear images with fine details.
2. Image Clarity (Pixel Density)
LED screens come in different sizes and have different qualities. Their size is based on physical dimensions, while their resolution quality is based on pixel pitch, like P1.5, P2, P2.5, P3, P4, P5, P6, and P8. Common pixel pitches are chosen based on how far away people will be from the screen. This helps make sure the picture is clear for the audience. Pixel pitch is how far apart the center of one LED pixel is from the center of the next one, measured in millimeters. A smaller pixel pitch means more pixels in a small area, which makes the image sharper and better, especially when you look at it up close. If you pick a big screen with a rough pixel pitch that doesn’t fit the needed pixel pitch for the viewing distance, people sitting too close will see separate dots instead of a clear image. This is known as the “screen-door effect”.
3. Engagement and Room Integration
In many workplaces, an LED wall should match the building’s design. It should not be too big and bold, or too small and plain. Big screens can dominate a room if they are too large, so it’s important to find a good balance between being able to see them and having a comfortable viewing experience. A small conference room looks messy and harsh if the screen covers 80% of the front wall. A stage backdrop for a live event looks unprofessional if the LED wall only covers 30% of what the audience can see. The right size helps cultivate the right feeling: interesting visuals, but not too overwhelming or underwhelming.
How to Measure an LED Screen (It’s Not Like a TV)
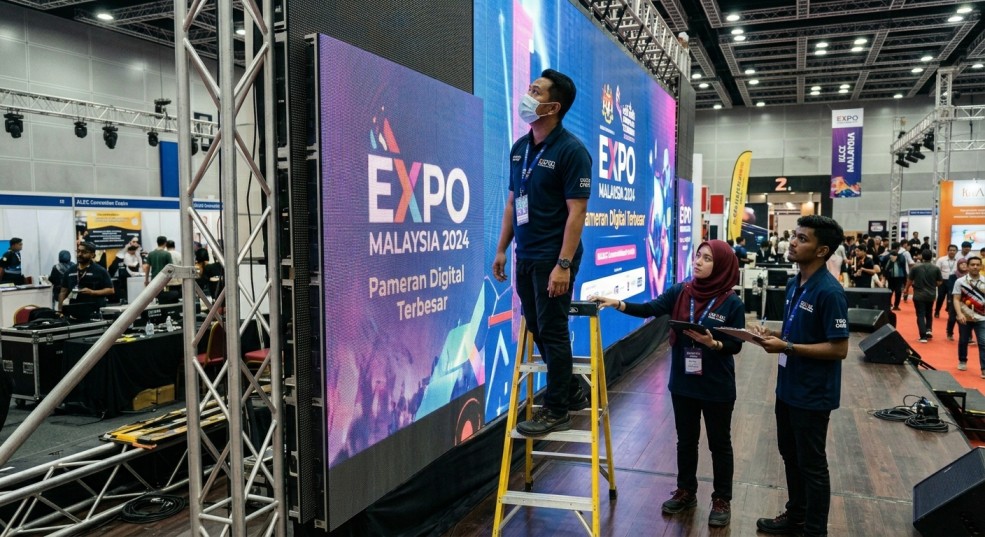
One of the biggest sources of confusion is how to measure things. Consumer televisions are measured from corner-to-corner in inches because that is a usual way to measure a flat screen. Professional LED walls are made of different pieces, with groups of separate cabinets or magnetic pieces. The size of a standard LED screen is usually shown as “Width × Height” in millimeters (mm) or meters (m). Hence, it is important to know different measurement units like millimeters, inches, meters, and feet. This helps you get the right size, do installations, and understand pixel density. It is also important to know the display area for planning good LED screen setups. It helps find the right cabinet size and ensures everything looks good within the viewing area.
There are three easy ways to find out or check the size of an LED screen, depending on the information you have at the start of your project.
Method 1: Calculate Size Using Module Count
LED modules are the smallest replaceable units in an LED display, and the LED module size is a key factor in determining the overall screen dimensions. LED modules typically range from 250×250 mm to 320×160 mm. If you know how many modules your screen uses horizontally and vertically, and the exact dimensions of each module, you can compute total size.
- Screen Width = (Number of horizontal modules) × (Module width in mm)
- Screen Height = (Number of vertical modules) × (Module height in mm)
Example: A screen built with 20 modules across (each 250 mm wide) and 12 modules down (each 250 mm high) yields:
- Width = 20 × 250 = 5,000 mm (5.0 m)
- Height = 12 × 250 = 3,000 mm (3.0 m)
This method is most useful during the design phase when you’re specifying components. Precise module sizing is especially important for small indoor displays or installations in confined spaces, where optimal visibility and fit are crucial.
Method 2: Calculate Size Using Cabinet Count
LED cabinets (also called “panels” or “crates”) are pre-assembled groups of modules, typically with integrated power and data connections. When planning your LED display, cabinet dimensions and LED cabinet sizes are important considerations, as they form the structural framework, and determine scalability and installation flexibility. Common cabinet sizes include 500×500 mm, 640×480 mm, 960×960 mm, and 1,280×960 mm. Standard cabinet sizes for LED screens include dimensions such as 500mm × 500mm for square cabinets and 500mm × 1000mm for widescreen cabinets, which are essential for various configurations. If your LED wall uses cabinets of a known size, the calculation is straightforward:
- Width = (Number of cabinets across) × (Cabinet width)
- Height = (Number of cabinets high) × (Cabinet height)
This is the most practical method for procurement and installation planning because cabinets ship as discrete units. It also helps you estimate weight, whereby most cabinets weigh 8kg to 15kg each, so a 4×3 cabinet array (12 cabinets) would weigh approximately 96kg to180kg plus frame.
Method 3: Calculate Size Using Pixel Pitch and Target Resolution
This is the most powerful method because it ties the LED wall’s physical size directly to how images are displayed. Pixel pitch (P) is measured in millimeters. If you know your desired horizontal pixel count (e.g., 1920 for HD and 3840 for 4K) and your chosen pixel pitch, you can calculate physical width. Different screen sizes can achieve the same resolution if the pixel pitch and corresponding pixels are matched.
- Width (mm) = (Number of horizontal pixels) × (Pixel pitch in mm)
- Height (mm) = (Number of vertical pixels) × (Pixel pitch in mm)
Example: You want a 4K-wide screen (3840 pixels) using P2.5 cabinets.
- Width = 3840 × 2.5 mm = 9,600 mm (9.6 m)
- Assuming a 16:9 aspect ratio, height = 2160 × 2.5 mm = 5,400 mm (5.4 m)
Common resolutions such as Full HD, 2K, 4K, and 8K are benchmarks for image quality and are frequently used to determine suitable screen sizes and applications.
This method is essential when a client says, “I need to show a 1080p video without scaling artifacts.” By matching physical pixel count to source resolution, you avoid the quality loss of non-integer scaling.
Understanding Aspect Ratio (So Your Content Doesn’t Look Wrong)
Even if your LED screen is the right size, it will look wrong if its shape does not match the aspect ratio of your content. Aspect ratio is the relationship between the width and height of something. There are different display sizes to fit different aspect ratios, ensuring your content looks good. Mismatched ratios make your media player or processor add black bars, bars on the sides, cut off parts, or stretch the image unevenly. All of these lower the professional impression.
Common Aspect Ratios in 2026
| Aspect Ratio | Typical Use Case | Resolution Example |
| 16:9 | Standard HD/4K video, corporate presentations, broadcast | 1920×1080, 3840×2160 |
| 21:9 | Immersive stage visuals, panoramic signage, cinematic content | 2560×1080, 3840×1600 |
| 32:9 | Ultra-wide data dashboards, trading floors, retail window displays | 3840×1080, 5120×1440 |
| 4:3 | Legacy content, certain educational material | 1024×768, 1400×1050 |
| 1:1 | Social media feeds, digital art displays, some retail kiosks | 1080×1080, 1920×1920 |
Video walls are often configured in these aspect ratios for control rooms, retail displays, and exhibition setups, providing high-resolution, large-scale visual presentations that effectively capture attention and display detailed data or dynamic content.
The Practical Rule
Design your LED wall to match the aspect ratio of 80% of the content you will display. If you show mostly HD video (16:9), build a 16:9 screen. If you install in a modern mall that uses ultrawide scenic backgrounds (21:9), build a 21:9 wall. Trying to make one screen fit every possible ratio usually results in compromises that annoy your operators and distract your audience.
Recommended LED Screen Sizes by Use Case (Starting Benchmarks)
While every venue is unique, standard LED screen sizes are often used as starting points for LED screen installations to ensure consistency, scalability, and ease of deployment. The following benchmarks have proven reliable across thousands of installations and help guide decisions on display quality and appropriate sizing. Treat these as starting points for your pre-design conversations.
Small Meeting Rooms & Huddle Spaces
- Typical Size: 2.0 m – 2.5 m wide × 1.2 m – 1.5 m high
- Common Aspect Ratio: 16:9
- Pixel Pitch: P1.2 – P1.9 (select the required pixel pitch for optimal image clarity at close viewing distances; finer pitch enables closer seating)
- Notes: These recommendations are especially relevant for conference rooms, where smaller LED screens with high resolution and the required pixel pitch are critical for close-up viewing and detailed presentations. Viewers are often 1 – 3 meters away. Screens should not exceed 40% of the front wall’s width to avoid overwhelming the space.
Retail Storefronts & Window Displays
- Typical Size: 2.0 m – 4.0 m wide × 2.0 m – 3.0 m high
- Common Aspect Ratio: 16:9 or custom (e.g., 4:3 for vertical posters)
- Pixel Pitch: P2.5 – P3.9 (customers view from 2 – 5 meters)
- Notes: These recommendations apply to retail spaces as well as storefronts. High brightness (2,000 – 4,000 nits) is often required for daylight visibility through glass. Transparent LED screens are suitable for installation on glass surfaces, allowing natural light to pass through while displaying vivid content.
Indoor Live Events & Stages
- Typical Size: 6.0 m – 12 m wide × 3.5 m – 6.0 m high
- Common Aspect Ratio: 16:9 or custom wide (e.g., 3:1 for panoramic backdrops)
- Pixel Pitch: P2.9 – P4.8 (front rows are farther back than corporate spaces; required pixel pitch depends on viewing distance and event size)
- Notes: Large displays are essential for event stages to ensure visibility for all attendees. Screens are often flown (rigged from truss). Weight and wind load (for outdoor tents) become major factors.
Outdoor Billboards & Large Advertising
- Typical Size: 10 m – 30 m wide × 5 m – 15 m high
- Common Aspect Ratio: Often custom (landscape or portrait orientation)
- Pixel Pitch: P6 – P10 (viewing distances often exceed 30 meters)
- Notes: Outdoor LED and outdoor screens are designed for large-scale advertising and public displays, requiring large screens for visibility in expansive outdoor environments. Must be IP65 rated for weather. Brightness needs 5,000 – 8,000 nits for daytime visibility.
The Golden Rules of Viewing Distance
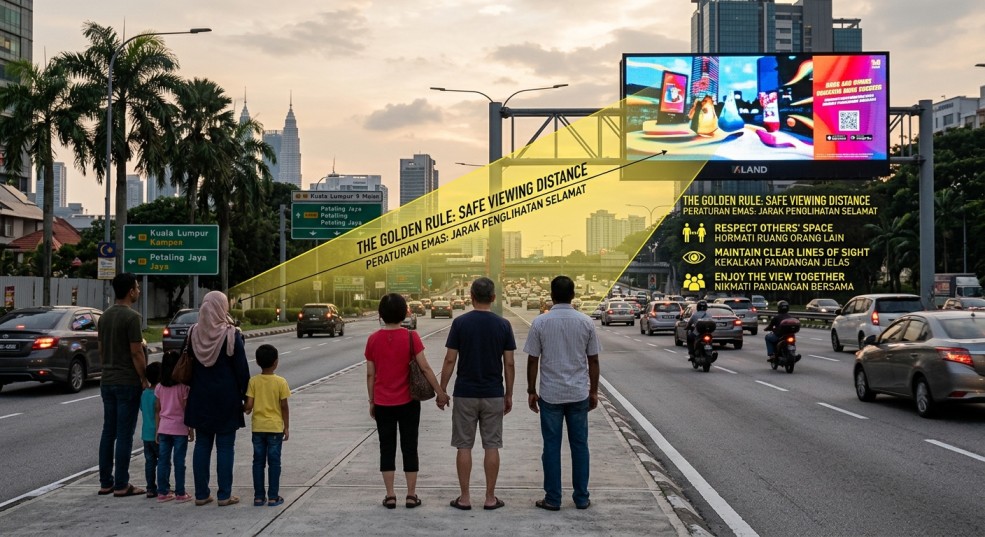
Physical size is meaningless if viewers cannot comfortably recognize content. Viewing distance is the single most important constraint in LED screen sizing. To ensure optimal clarity, you can calculate minimum viewing distance using the pixel pitch of the LED display. Two complementary rules govern this relationship.
Rule 1: Minimum Viewing Distance (Pixel Visibility)
The human eye has finite angular resolution. If you sit too close to a screen with a given pixel pitch, you will see individual pixels. The industry-standard approximation is:
Minimum comfortable distance (meters) ≈ Pixel pitch (mm)
| Pixel Pitch | Minimum Distance |
| P1.5 | 1.5 m |
| P2.5 | 2.5 m |
| P3 | 3 m |
| P4 | 4 m |
| P5 | 5 m |
| P6 | 6 m |
| P8 | 8 m |
For critical viewing (text-heavy content), double this distance. For ambient video (moving images with few fine details), you can reduce it by 20 – 30%.
Rule 2: Maximum Viewing Distance (Readability)
For viewers to recognize 20-point text or a human face, the screen’s physical height should follow:
Screen height ≈ Distance to farthest viewer ÷ 6
Example: If your farthest audience member sits 30 meters from the wall:
- Ideal screen height = 30 ÷ 6 = 5.0 meters
- At 16:9 aspect ratio, width = 5.0 × (16/9) ≈ 8.9 meters
This rule ensures that the screen takes up about 9 – 10 degrees of the viewer’s vertical view. This is the best spot for comfortable watching without moving your head.
Putting Both Rules Together
In a real place, you must follow both rules at the same time. Picture a room that is 30 meters long. Rule 2 says you need a screen that is 5 meters high. If you choose a P3.9 pixel pitch, Rule 1 says the closest viewer should be at least 3.9 meters away. But if your front row is only 2 meters from the screen, you need a smaller pixel size (P1.9 or P2.5) to avoid seeing the pixels up close. This might make your costs go up.
Brightness, Contrast, and Ambient Light (Often Overlooked)
Size and larger pixel pitch get all the attention, but brightness (measured in nits or cd/m²) determines whether your screen is visible in its environment. A beautiful P1.9 screen that is too dim for a sunlit storefront is worthless.
- Indoor, controlled lighting (boardrooms, control rooms): 600 – 1,000 nits
- Indoor, bright ambient (shopping malls, lobbies with skylights): 1,500 – 1,800 nits
- Outdoor, shade or indirect light: 3,500 – 4,500 nits
- Outdoor, direct sunlight: 5,000 – 7,000 nits
If your outdoor screen must be large but your budget limits you to a coarser pixel pitch, you can sometimes compensate with higher brightness to maintain visibility at greater distances. Conversely, an overly bright indoor LED screen causes eye strain and poor perceived contrast (dark areas look gray).
Pro Tips to Avoid Costly Mistakes
Even with perfect calculations, projects fail when real-world installation realities are ignored. Here are five professional safeguards:
1. Measure Floor to Ceiling & Plan Clearance
It is not enough to measure the wall surface. You must account for:
- Bottom clearance: The lowest edge of the screen should be at least 1.2 – 1.5 m above the floor to be visible over standing audiences or furniture.
- Top clearance: Leave 200 – 400 mm for rigging hardware, ventilation, and service access.
- Side clearance: Allow 200 – 300 mm on each side for cable management and airflow.
2. Confirm Structural Support Before Ordering
A 10 m² P2.5 indoor screen (comprising approx. 195 modules of 320 mm x 160 mm, or 25 – 30 standard die-cast cabinets) typically weighs 250 – 400 kg. Adding the steel frame, mounting brackets, and maintenance infrastructure can bring total load to 500 – 800 kg. Many drywall or plaster walls assemblies cannot support this concentrated load without structural reinforcement. Always obtain a structural engineer’s assessment or specify a floor-supported frame.
3. Plan for Your Real Content, Not Just Test Patterns
The “right LED screen size selection” changes drastically based on content type:
- Text-heavy (lyrics, data, subtitles): Requires finer effective resolution. Use Rule 1 with a safety factor of 1.5×.
- Video and graphics: More forgiving. Slightly coarser pitch is acceptable.
- Branded logos: Ensure logos are not cropped by unusual aspect ratios. Run a content simulation before finalizing cabinet layout.
4. Future-Proof Your Resolution
If you’re building a permanent installation, design for common video standards:
- 1080p HD: 1920×1080 pixels
- 4K UHD: 3840×2160 pixels
Designing for 4K today costs more in cabinets, but saves you from being obsolete in 3 – 4 years. If the budget is low, set the width to 3840 pixels, but only fill the middle 1920 pixels at first. The cabinet can be filled later.
5. Account for Viewing Angle
LED screens look different when viewed off-axis. If your audience sits in a wide arc (e.g., theater seating that wraps around), specify cabinets with wider viewing angles (140°–160° horizontal). Standard cabinets drop in brightness and shift color beyond 120°. For narrow rooms (like long mall sanctuaries), standard 120° panels are sufficient.
Final Takeaway: The Best LED Size Fits Your Venue, Audience, & Budget
The perfect LED screen size is not a guess, nor is it simply “the biggest you can afford”. It is the result of aligning six interdependent variables:
- Venue architecture (mounting surface, ceiling height, rigging points)
- Viewing envelope (closest and farthest audience distances)
- Pixel pitch (the balance between sharpness and cost)
- Content aspect ratio and type (text vs. video vs. graphics)
- Ambient light (required brightness to overcome the environment)
- Structural and access constraints (weight, clearance, maintenance)
When these match, the LED wall adds to the space, making it easy-to-see, comfortable, attractive to look at, and done without wasting money or having regrets after installation.
Next Step: Get a Custom Sizing Recommendation
If you share the following details, we can provide a specific recommendation for your project:
- Venue dimensions (width, depth, ceiling height)
- Audience engagement distances (closest seat to screen, farthest seat)
- Primary content types (presentations, live video, outdoor advertising, data dashboards)
- Ambient lighting (controlled indoor, window-lit, direct sunlight)
- Installation type (wall-mounted, floor-supported, flown from truss, curved or flat)
- Target resolution or pixel pitch (if you already have a preference)
With that information, we will estimate:
- The recommended screen width and height
- A pixel pitch range that satisfies your viewing distances
- An approximate cabinet count and weight estimate
- Potential structural, or clearance warnings specific to your use case
LED display screen technology is changing quickly in today’s landscape. Fortunately, the basic ways humans see things and the rules of shapes have not changed, and they are more than likely to remain the same. Learn these sizing rules, and you will always create screens that look great, feel good, and work well for a long time.
YOUR COMMENT